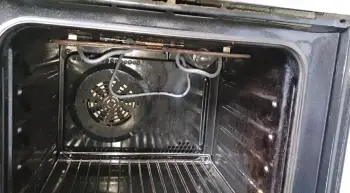
When you need to bake, broil, or roast food, an electric oven can handle the job quite effectively. In almost every kitchen, there is an electric oven since they are so convenient to use.
The main source of heat in an electric oven comes from the coil, also known as the heating element. This element helps to heat the food quickly and evenly. If your bake element isn't working, then you need to change it.
Knowing how to change a bake element in an electric oven is an essential skill for every electric oven owner. We will now look at the steps required to replace this vital component in your electric oven. We hope this guide will prove useful.
Where is the Bake Element Located?

In order to change the bake element, you need to know where it is located. Generally, an electric oven has two heating elements. One is located at the top of the oven, which is called the broil element.
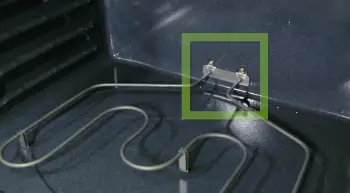
This element is used when you need to broil food. On the other hand, the bake element is located at the bottom surface element of the electric oven. It is usually a long, thin coil that is attached to the lower side of the oven's back wall.
How does the Bake Element Work?
An oven's bake element is responsible for providing heat so that food can be evenly cooked. In an electric oven, there is a control board, a temperature sensor, a fan, and two heating elements.
A fan is also present in the oven. During baking, the temperature sensor monitors the heat inside the electric oven, and the control board regulates the power to the heating element. Additionally, the fan circulates the hot air throughout the oven.
The bake heating element is connected to the two little metal prongs that protrude from the back of the oven. Wires are used to connect the metal prongs to the control board and to the temperature sensor.
These wires are all connected to the power source. Now, if you connect the power and turn on the oven, the control board will send electricity to the heating element.
Electricity will flow through the metal prongs and into the baking element. Once heated, the baking element will emit heat. This heat will be circulated by the fan around the oven so that your food can be cooked evenly.
How to Change a Bake Element in an Electric Oven - Step-By-Step Instructions
After prolonged use, the oven element in your electric oven may eventually stop working. If this happens, you need to know how to change it.
Once you are familiar with where the heating element is located and how it works, you will be able to comprehend the changing process more efficiently.
Changing the heating element is not difficult, and it can be accomplished in a few simple steps. We will describe each step in detail below.
Step 01: Collect the Required Tools

In order to change the heating element, you will need a few tools. These include a screwdriver, nut driver, needle-nose pliers, and replacement baking coil. Once you have gathered all of the required tools, you can begin the process of changing the heating element.
Step 02: Shut off the Power to the Oven
Before beginning any work on your oven, you must never forget to shut off the power. To do this, locate the circuit breaker box in your home and flip the switch that corresponds to your oven. This will ensure that you do not accidentally electrocute yourself while working on the oven.
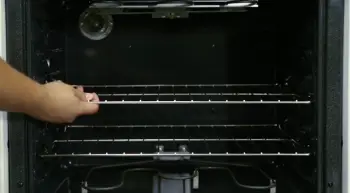
Step 03: Remove the Oven Racks
Once the power to your oven has been shut off, you can begin removing the oven racks. Simply remove them from the oven by pulling them out. They should slide out easily. If they are stuck, you may need to use a little force. Set the oven rack aside in a safe place.
Step 04: Remove the Oven Door
Next, you will need to remove the oven door. In order to do this, open the oven door all the way. Then, look for two screws that are located on the top hinge of the door. Use a screwdriver to remove these screws.
Once they have been removed, you can close the oven door slightly. This will allow you to disconnect the door from the hinges. Once disconnected, lift the door off of the oven and set it aside in a safe place.
Step 05: Disconnect the Holding Nut
After the door has been removed, you will be able to see the oven element. Now, you need to disconnect the holding nut or mounting screw that is attached to the element. First, locate the holding nut.
It is located on the back wall of the oven, and it is attached to the heating element. Place the nut driver over the holding nut and turn it counterclockwise until it is loose. Once loose, you can remove the holding nut by hand.
Step 06: Disconnect the Wires
Now that the holding nut has been removed, you will be able to disconnect the wires that are attached to the heating element.
Use the needle-nose pliers to remove the two-wire nuts that are holding the wires onto the heating element. Once the wire nuts have been removed, you can pull the wires off of the element.
Step 07: Remove the Bake Element

The oven element is now loose and can be removed from the oven. Simply pull it out from the back wall of the oven and set it aside.
Step 08: Install the New Bake Element
Now, it is time to install the new heating element. Simply take the new element and insert it into the opening where the old element was located.
Step 09: Reconnect the Wires
Once the new oven heating element is in place, you can now reconnect the wires. First, take the two wires and place them onto the new element. Make sure that they are snug so that they do not fall off. Next, use the needle-nose pliers to hold the two-wire nuts in place.
Step 10: Reconnect the Holding Nut
After the wires have been reconnected, you can now put the holding nut back in place. Simply take the nut and screw it onto the heating element using the nut driver. Make sure that the nut is tight so that it does not come loose.
Step 11: Insert the Racks
Now, you can put the racks back into the oven. Simply insert them one at a time until they are both in place.
Step 12: Install the Oven Door
Finally, you can put the oven door back on. First, place the door onto the hinges. Then, use the screwdriver to put the two screws back in place on the top hinge. Once both screws are in place, you can open and close the door to make sure that it is installed correctly.
Step 13: Turn On the Power
Once all of the steps have been completed, you can now turn the power back on to the oven.
Locate the circuit breaker box in your home and flip the switch that corresponds to your oven. This will turn the power back on. You can now use your oven as usual.
If you have followed all of the steps correctly, you can easily change a baked element in an electric oven.
Frequently Asked Questions:
A few questions are commonly asked regarding the bake element on an electric oven. Here are a few of the most frequently asked questions and their answers.
1. What Causes the Bake Element to Go Bad?

There are a few different things that can cause the bake element to go bad. One of the most common causes is simply because of age.
Over time, elements will wear out and will need to be replaced. Another common cause is if the element has been used too often. If it is used excessively, it can cause the element to overheat and make the oven cavity that eventually goes bad.
2. How Do I Know if the Bake Element Needs to Be Replaced?
There are a few signs that you can look for that will indicate whether or not the heating element needs to be replaced. One of the most common signs is if the oven is not heating up correctly.
If the oven is not reaching the correct temperature, it could be because the heating element is not working correctly. Another sign to look for is if the element is visibly damaged. If the element is cracked or broken, it will need to be replaced.
3. How Long Does a Bake Element Usually Last?
The average lifespan of a bake element is around 5 years. However, this can vary depending on how often the element is used. If the element is used excessively, it may need to be replaced sooner.
4. From What Material is a Bake Element Made?
Bake elements are typically made from a material called nichrome. The nichrome is a type of wire that is resistant to high temperatures. It is this resistance to high temperatures that make it ideal for use in an oven.
Conclusion
We hope that you have a full understanding of how to change a bake element in an electric oven. This is a relatively simple task that can be completed with just a few tools and a little bit of time. Be sure to follow all of the steps correctly in order to avoid any damage to your oven.


